
Creating a Simple To-Do App with TypeScript, Node, SQLite, and ExpressJS
Have you found yourself needing a place to keep a list of To-Dos, but don’t trust big companies with having all of your information? Need the most lightweight todo client possible that you can access from anywhere? Want to be able to share a To-Do list with anyone, without having them download fancy apps and set up accounts? I certainly have, and instead of scouring the internet to try to find a solution, I decided to build it myself. The product ended up being a Node server using ExpressJS to render the webpage, using TypeScript to handle backend requests, and storing the To-Dos on an SQLite server on the server. Though this was only truly intended as a tool to learn the technologies and putting them together, it technically is a fully functional To-Do list, and I might just plan to use it in the future for quick and dirty tasks to keep track of.
This tutorial is heavily inspired by missating’s nodejs-todo project. Thanks!
Set up and installation
Node
Node is Server-Side JavaScript that you can use just as you would any other server-side language like Java or Python. Our application depends on this because we’ll be using several different Node packages, such as the sqlite3 package to store our data and the ejs (ExpressJS) package to server our front-end website. Getting it installed depends on your architecture; if you have Ubuntu/Debian, you can simply run
sudo apt-get install nodejs
Otherwise, you’ll want to look at the Node downloads page to install it.
After you have it installed, you’ll want to check to make sure it works by opening a terminal and typing in npm -v. If you get a response, congratulations! You’ve got everything working.
TypeScript
As a developer with a higher concentration in strongly-typed languages, TypeScript is probably my favorite tool for modern, web-first programs and applications. TypeScript compiles directly to JavaScript, meaning that its use can be applied to any project that uses JavaScript, and it keeps things in check more so that pure JavaScript. To get it downloaded, you’ll have to install it within node:
npm install -g typescript
This will install Express globally. If you would like to install it only for this project, you can do so with npm install typescript --save.
ExpressJS
ExpressJS is a lightweight Node.js web framework that’s going to get us up and running really quickly. In order to install it and add it to our project, we’re going to run the npm command, which is the Node Package Manager:
npm install express --save
BodyParser
BodyParser is a module we’ll need to help us handle values we transfer to and from the database. Install it with:
npm install body-parser --save
SQLite
SQLite is our choice for databases here because of how light it is, how portable it is, and how easy it is to back up/migrate it whenever we need to, as it saves everything into a .db file. It uses a simplified SQL language version, and has <1ms response times!
Like with Express, the installation goes as follows:
npm install sqlite3 --save
Now that we have all of our dependencies, installed, we’re ready to create a new project and get coding!
The Fun Stuff
Here is the repository where I host the current iteration of the todo app. If you’d like to skip the following along part, you can just fork this repository.
The first thing we’re going to do to start off our coding is some simple Node and Express things:
- Create a new directory named
todo-mini. - Navigate to the directory in a terminal and run
npm init. - Fill out the requested information in as much depth as you like, making sure to set the
"main"field toindex.tsinstead ofindex.jsbecause we’re using TypeScript. - Create a new file called
index.tsand open it in your favorite text editor.
Configuring TypeScript for Node
Because we’re going to be using TypeScript instead of pure JavaScript for our Node app, we have to make some slight configuration changes to our package.json:
- Under
"scripts", we’ll add"tsc": "tsc"so that we can compile our TypeScript into JavaScript when we run our app. - We’ll double check that our
"main"is set to"index.ts".
Note: We can also set this within the initial configuration.
Hello World
Inside our index.ts, we first import all of our dependencies:
// Import all of our dependencies
var express = require("express");
var bodyParser = require("body-parser");
var app = express();
We’ll also be importing some TS files we’ll write ourselves, but we’ll do that later.
Now, let’s configure Express to serve us some web:
// Instantiating the Express object.
var app = express();

// Handles whenever the root directory of the website is accessed.
app.get("/", function(req, res) {
  // Respond with Express
  res.send("Hello world!");
});

// Set app to listen on port 3000
app.listen(3000, function() {
  updateValues(function() {
    console.log("server is running on port 3000");
  });
});
Once this is done, if we run our Node app with:
npm run tsc && node build/index.js
and we navigate to the website we just hosted at http://localhost/4000, we should see it return Hello World!
Creating our To-Do List
While really cool, this doesn’t really let us do anything with or to-dos! Let’s actually design the view that we’re going to be seeing:
SQL Module
First, before we do anything, we need to create our SQLite database and create the appropriate tables we’ll be accessing later on within our sqlite3.ts file. The way you’ll do this varies depending on your development environment, but for me, using VSCode and the SQLite extension, I just have to open the command palette and type in New Quick Query, and write the following:
CREATE TABLE todo(
  task text
);

CREATE TABLE done(
  task text
);
We should now have two tables created, which store a text value of the task to do. That way, if we need to add more functions later on, it’s easy to add columns to each table.
Now, we have to write the SQL module that creates the database and sets up the framework so that we can store our to-dos. Create a new folder named modules and add a new file named sqlite3.ts inside it, and then import and initialize sqlite within our custom module.
sqlite3.ts:
// Importing SQLite3 to our project.
var sqlite3 = require("sqlite3").verbose();
// Setting up a database for storing data.
var db = new sqlite3.Database("database.db");
Since this is a Node module, we’ll write it a little bit differently index.ts. We’ll encase all of our functions within module.exports, like so:
module.exports = {
  // All of our functions go here.
};
Inside of module.exports, we’re going to place functions that handle our requests from index.ts, namely, an ability to add tasks, mark them as completed, and remove the ones that have already been completed. We’ll also add functions to fetch the incomplete and complete tasks so we can populate the website whenever we refresh the page.
First, the function to get the incomplete tasks:
  getTodoList: function(callback:any){
    db.all("SELECT * FROM todo", function(err:any, res:any){
      callback(res);
    });
  },
Similarly, another function to get the incomplete tasks:
  getDoneList: function(callback:any){
    db.all("SELECT * FROM done", function(err:any, res:any){
      callback(res);
    });
  },
Then, functions to add, mark as complete, and clear completed tasks:
  addTask: function(taskName:string, callback:any){
    // Add a task to the todo list.
    db.run("INSERT INTO todo VALUES ($task)", {
      $task: taskName
    }, function(){
      callback();
    });
  },

  completeTask: function(taskName:string, callback:any){
    // Delete the task from the todo list.
    db.run("DELETE FROM todo WHERE task=$task", {
      $task: taskName
    }, function(){
      db.run("INSERT INTO done VALUES ($task)", {
        $task: taskName
      }, function(){
        callback();
      });
    });
  },

  clearComplete: function(callback:any){
    // Delete all cleared tasks.
    db.run("DELETE FROM done", function(){
      callback();
    });
  }
These are all pretty straightforward SQL commands that we just interface through the SQL plugin with. If you would like more background knowledge with SQL, w3schools provides a great set of tutorials on SQL.
TypeScript
Before we can render HTML with Express, we’ll have to add these lines right after our require statements. These settings allow us to use Express, our CSS, and the custom made HTML we’re about to write.
// Set up BodyParser.
app.use(bodyParser.urlencoded({ extended: true }));

// Set the view engine to use Express.
app.set("view engine", "ejs");

// Custom-made SQLite module.
var sqlite = require("./modules/sqlite3");

// Render the CSS Files
app.use(express.static("public"));
After we’ve done that, we will change the default root directory action to access our index.ejs file instead of printing “Hello World!”:
// Render the ejs and display added task, completed task
app.get("/", function(req: any, res: any) {
  updateValues(function() {
    res.render("index", { task: task, complete: complete });
  });
});
TypeScript Functions
Now, we’ll write the HTML request endpoints so that we can query information:
index.ts:
// Adding a new task.
app.post("/addtask", function(req: any, res: any) {
  var newTask = req.body.newtask;
  // Add the new task from the post route.
  sqlite.addTask(newTask, function() {
    res.redirect("/");
  });
});

// Removing a task.
app.post("/removetask", function(req: any, res: any) {
  var completeTask = req.body.check;
  sqlite.completeTask(completeTask, function() {
    res.redirect("/");
  });
});

// Clearing all complete tasks.
app.post("/clearcomplete", function(req: any, res: any) {
  sqlite.clearComplete(function() {
    res.redirect("/");
  });
});
We’ll also need a function to update the values of the tasks and their completion status every time the app refreshes:
/**
 * Updates the todo/done lists.
 */
function updateValues(callback: any) {
  sqlite.getTodoList(function(result: any) {
    task = result;
    sqlite.getDoneList(function(result: any) {
      complete = result;
      callback();
    });
  });
}
Now, we should have all of the necessary components in the backend to handle all of our functionality. Now, to spice things up with HTML and CSS.
HTML (EJS)
To actually write the HTML contents of our app, we’re going to want to create a new EJS directory named views in our root directory, and create a new file titled index.ejs. Though the extension isn’t .html, it will actually render as it, so hopefully your IDE highlights it as such.
We’ll place the following in that index.ejs file:
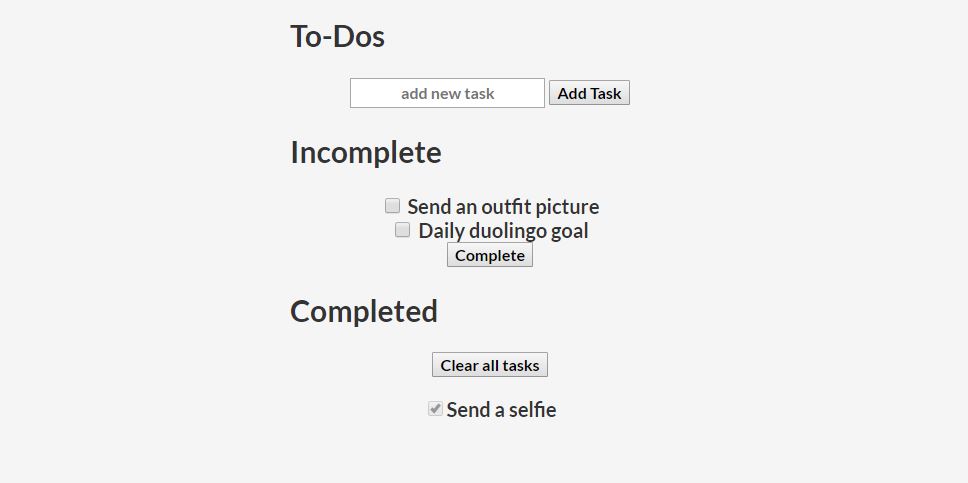
This places all of our necessary components, and defines all the necessary HTML requests so that we can access and insert information into our to-do list:
addtask- Allows us to add a task.
removetask- Allows us to mark a task as completed (remove it from the to-do list)
clearcomplete- Clears all of the completed tasks.
Now that we’ve defined these requests in the HTML, we’ll move on to the TypeScript file and add some endpoints to them.
CSS
I won’t be going too much into detail with the CSS, because it’s a long thing to teach in one article that doesn’t focus too much on it, but I’ve made available my CSS Stylesheet for this project. You’ll want to download this file and place it under todo-mini/public/ to import this CSS to our project. You can mess with these settings as much as you’d like - the CSS I have written is a bit simplistic but you can tune it up a lot!
Running the program
That’s it! We’ve successfully employed SQLite, Node, TypeScript, and EJS to create a simple To-Do list with persistent storage. Go into a terminal and navigate to the directory of your project, and type:
npm run tsc && node build/index.js
Then, navigate to the app:
http://localhost:3000/
And revel at what you’ve accomplished.
See you next time, and happy coding!